STENCIL.ONE
How to Create Moodboards For Your Films & Documentaries
Learn how to build a visual bible for your film in Stencil, from creating a global moodboard library to linking reference images directly to individual shots in your script.
![]() Software version 1.1.1
Software version 1.1.1
How to Build a Visual Bible for Your Film With Moodboards
When you look at any great film, you’ll notice a stylistic consistency running through every single image — a cohesive visual language that ties each shot to the next. That consistency doesn’t happen by accident.
Behind it is a deliberate creative vision, established long before the camera ever rolls. And the tool that kicks off that creative visual process — the one that helps filmmakers establish their story’s visual identity before production even begins — is the moodboard.
In this tutorial, I’m going to show you how to build and organize a moodboard inside Stencil, and how to tie those reference images directly to individual shots in your script.
What Is a Visual Bible and Why Does Your Film Need One
Before a single frame is captured, the most intentional filmmakers have already established how their film is going to look and feel. Every color palette decision, every lighting reference, every compositional idea — all of it lives somewhere before it lives on screen.
A moodboard is where that process begins. It’s a curated collection of reference images that defines the visual identity of your project. Think of it as the foundation of your film’s visual bible — the document that keeps your entire creative team aligned on what the final product should look and feel like.
That visual consistency you notice in great films doesn’t happen by accident. It starts with a deliberate creative vision established long before the camera rolls.
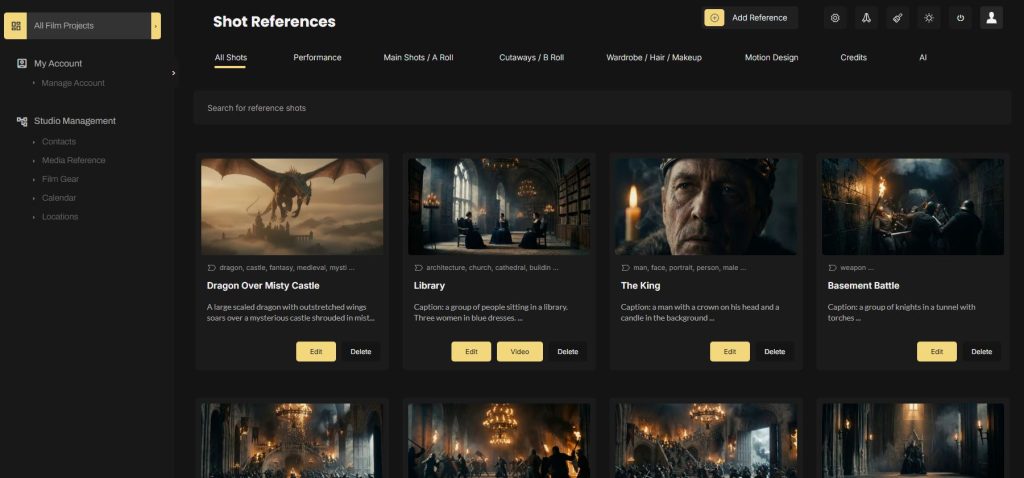
How to Create Moodboard Images in Stencil
Inside Stencil, moodboards live under ‘media references’ in the sidebar. If you’re new to Stencil, you’ll start with a blank library. Click the add button and you’ll have two options: use the built-in AI image generation tool to create reference images from a text prompt, or upload your own reference images from your existing collection.
If you’re uploading your own image, start by giving it a title and uploading the file. From there, Stencil automatically describes the image, tags it with relevant keywords, and pulls out any dominant colors. If the AI gets something wrong or you want to add more detail, everything is fully editable.
It’s really helpful to thoroughly describe and tag your moodboard images — because over months or years, this library will grow, and search is how you’ll find what you need.
Once saved, your images are searchable by title, keywords, tags, shot type, description, and even color. That last one is particularly useful when you’re trying to track down a reference with a specific tone or palette across a large library.
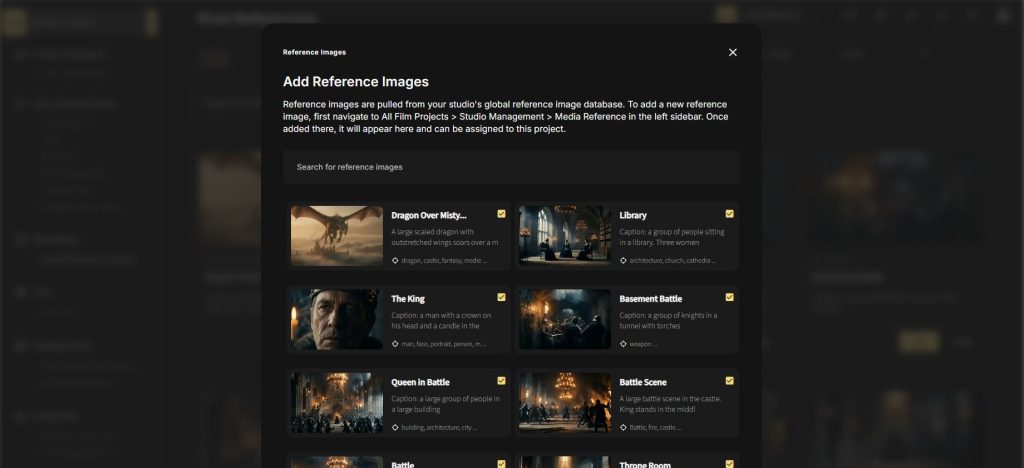
Understanding Global vs Project-Level Moodboards
One of the most important things to understand about how Stencil is structured is the difference between studio-level assets and project-level assets.
When you create reference images on your main studio dashboard, they are global assets. They belong to the studio, not to any specific project. This means you can build up a growing catalog of reference images over time and then pull from that catalog across any project you’re working on — whether that’s a feature film, a documentary, a music video, or a YouTube series.
To apply reference images to a specific project, click into that project from your main dashboard and look for ‘media reference library’ in the sidebar. This is your project-specific moodboard. From here, click ‘add reference images’ and you’ll be pulling directly from your studio’s global library.
By first adding reference images at the studio level, you can drill into any project and apply those images as moodboard references without duplicating your work.
And if you ever remove an image from a project’s moodboard, it only unlinks it from that project. It stays in your global library and can be reused on anything else.
How to Tie Moodboard Images to Individual Shots in Your Script
This is where things get really interesting. Once your reference images are associated with a project, you can link them directly to individual shots within your script.
Let’s say you’ve just finished writing a scene and you want to start sketching out how the words on the page will translate to images on screen. You may not have storyboard images or location photos yet. Perhaps all you have is a rough idea you’re stitching together from reference images or AI-generated visuals. That’s actually a great place to start.
To add a shot to your scene, click the add button, select the ‘reference’ tab, and then click ‘library’. Because you’ve already linked your global reference images to this project, they’ll all appear here. Select the image that best represents the shot you’re planning, give the shot a name, and save.
Historically, storytelling software has been kept separate from storyboarding software. In Stencil, we’ve changed that — by visually placing your story’s images closer to your script.
Make sure ‘reference’ is selected from the dropdown on your main writing page, and your reference images will appear in line with your script. Continue adding shots and you’ll build out a visual shot list for the entire scene — one that lets you preview how your audience will experience it on screen.

Building an Animatic Before You Ever Pick Up a Camera
Each shot in Stencil can hold multiple image types. You can start with a reference image, then later swap in or add location photos, proper storyboard illustrations, or production stills as they become available. The image associated with each shot evolves alongside your production.
You can also click on any shot image to expand a text box and add the specific dialogue or scene description associated with that image — essentially building a rough animatic that maps your script to your visuals, shot by shot.
It’s kind of like using animatics to start editing your film before you even start shooting.
You can drag and drop shots to reorder them at any time, and clicking any image brings up a larger preview. As your moodboard grows and your shot list fills in, you’ll have a clear, visual representation of how your story will play out on screen — all living right next to the words that inspired it.
Start Building Your Film’s Visual Bible in Stencil
The filmmakers who show up to set with the clearest visual vision are the ones who did the work before production began. A well-built moodboard keeps your creative team aligned, your shot planning grounded, and your vision intact from the first reference image all the way to the final cut.
Stencil’s moodboard and media reference tools are just one part of a much larger platform built for filmmakers and visual storytellers. It also includes tools for story planning, shot lists, storyboards, location management, casting, plot visualization, and more.

All-In-One Film Production Software
Stencil comes will all of the tools you need to manage your film production studio. We help you manage storytelling, budgeting, casting, location scouting, storyboarding and so much more!
![]() Software version 1.1.1
Software version 1.1.1
![]()
A software solution designed to help filmmakers complete compelling stories.
![]() Version 1.1.1
Version 1.1.1
USE CASES
Feature Films
Documentaries
Shorts
Music Videos
Commericals
Fashion Films