STENCIL.ONE
Screenplay Formatting Rules (For Beginners)
In this tutorial we’re going to dive into the basics off screenplay formatting and talk about the 8 script components that you’ll use 90% of the time. Let’s jump in.
![]() Software version 1.1.1
Software version 1.1.1

8 Important Screenplay Formatting Rules (For Beginners)
Getting Started With Screenplay Formatting
After logging into Stencil, click on the project you want to work on and then click over on “script. To begin, ensure that you’re using a 12 point size Courier font type with single line spacing.
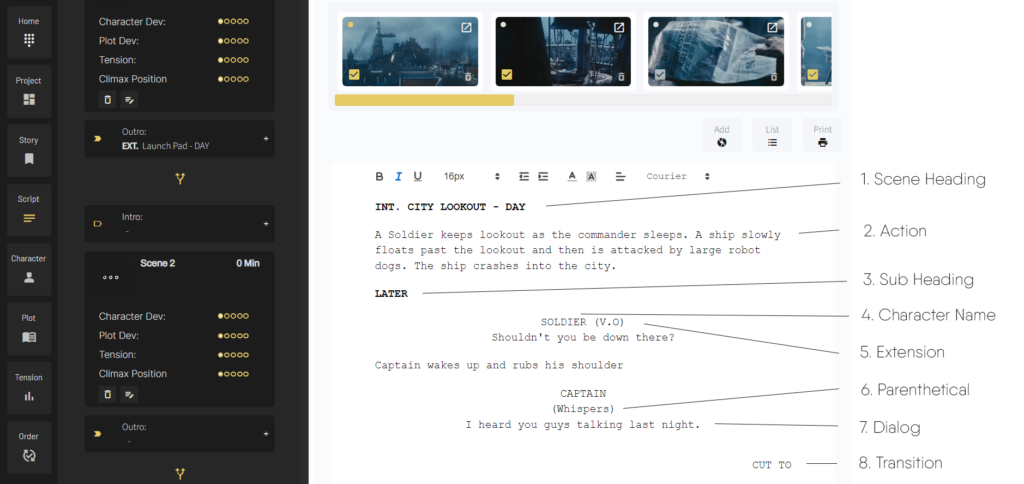
So how does screenplay formatting work? When looking at most scripts we can break them down into the following 8 components.
- First, we have the scene heading.
- Then below that we have the “action” section
- Below that you’ll see we have a sub-heading section
- Below that you’ll see the character name
- Then Extensions (which is optional)
- Below that you’ll see the parenthetical (which is also optional)
- Then the character’s dialog
- And lastly here you’ll see a “transition”.
So let’s look at each one in more detail.
Login to Your Screenwriting Software
Stencil is film production management software which includes built-in screenwriting software, but you can apply what I’ll teach you today in whatever screenwriting software you use.
Slugline
So when working with screenplay formatting, you’ll often start with the slug-line or scene heading. The slug-line needs to be bolded and written in ALL CAPS. The slug-line will contain three pieces of critical information.
The first part of the slug line indicates if the scene takes place in an interior or exterior location, or some combination of both. This section ends with a period.
After that, the scene’s setting will be indicated. This section ends with a dash.
And lastly, the third part of the slug line contains the time of day. These will generally be “dawn, day, dusk, or night”.
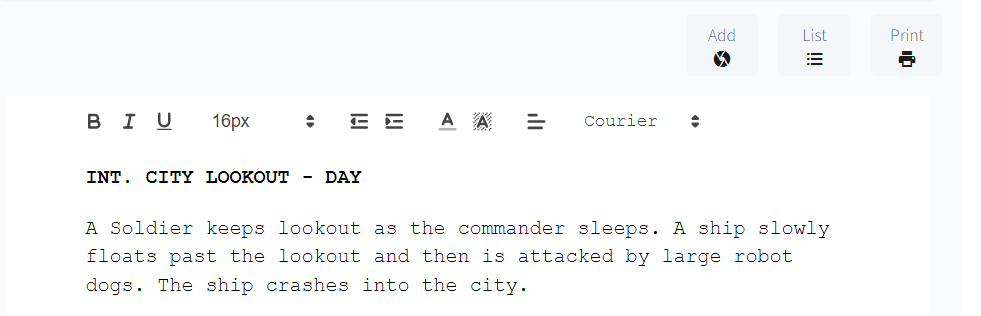
Action
After the scene heading we have the “action” element (see image above). This element describes one or more of the following things:
First – If a script is introducing a character for the first time, it will generally provide a character description here. Similarly, if this is the first time you’re introducing a character within your screenplay, their name should be in ALL CAPs. However, keep in mind that this only applies to the first time they are introduced.
Second – To help screenplay readers better experience the environment of the scene, the screenwriter will often describe, in more detail, the location. If it’s an interior location, the writer might describe the interior decorations or important objects in the scene. If it’s an exterior scene, the writer might describe the mood or the weather.
Third – This section is often used to describe character or object action. In this section you can expand on what the characters or objects in your scene are doing. For example, if your character is running, you can write that here. Similarly, if your audience is seeing a plane taking off you can also write that here. This helps your audience visualize, what’s going on in the scene.
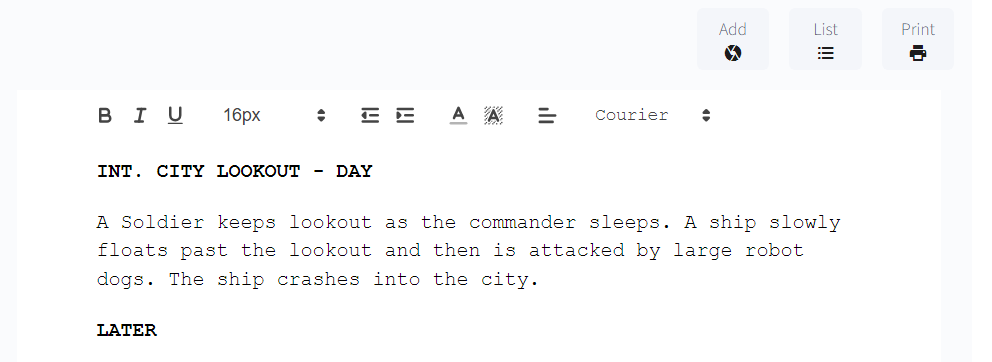
Sub headers
Sub-headers are similar to slug-lines, but they are less specific. They are commonly used to indicate another location within the scene or a jump in time. Again, they are capitalized and bolded.
For example, if, within the same scene, we are located in a house but we jump from the bedroom to the kitchen, we can simply use a sub-header to make that jump.
Or perhaps we don’t want to jump space, but instead jump time. That’s easy to do by writing something like “LATER” (see image below).
Character Names
Next, we have the character element. This element varies depending on the writer’s needs. However, at a minimum, you’ll always write your character’s name as well as their dialog.
Character names will be centered and in ALL CAPS and the dialog itself will be restricted to the middle of the page.
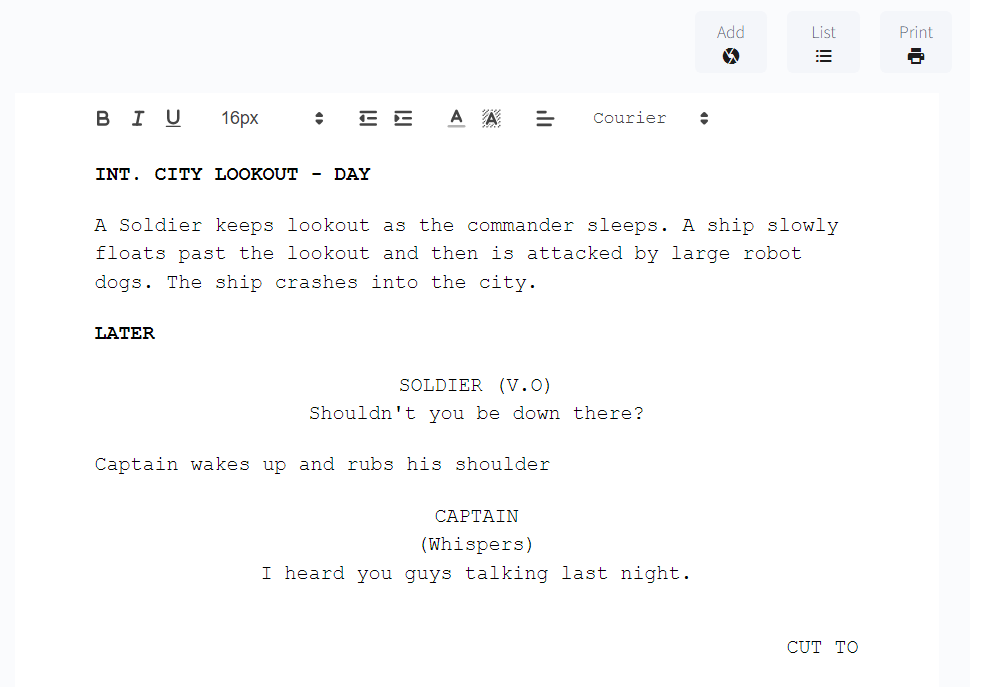
Extensions
Next, we have extensions. These screenplay formatting elements are found to the right of the character name in brackets and tell the reader how the audience will “hear” the following dialog. for example, here we could place “voice over (V.O)” if the following dialog will be heard as a voice over, or “Off screen (O.S.)” if the dialog is heard off screen.
Parentheticals
Next, below the character name, you’ll sometimes see centered text in brackets. These are parentheticals and they provide direction to the actor speaking the lines below. For example, should the actor “scream” the dialog, “whisper” it, or should they “hesitate” before they say their lines.
Transitions
Lastly, let’s talk about transitions. These text elements are right aligned and they tell a script’s editor how to transition from one segment or scene to another. Generally speaking, transitions are used sparingly, if at all, in modern screenplays. However, there may be times in some scripts, where providing transition direction within the screenplay will be necessary. Some possible transition options include:
Cut to
Fade to
Match cut to
and… Dissolve to
Don’t Overcomplicate Screenplay Formatting
So that’s the basics of screenplay formatting. Of course, there is more that can go into it, but the elements I talked about today will cover about 90% of what most screenwriters need to think about most of the time.
Also, don’t let formatting take away from your writing process. Especially early on. You can always iron out any script formatting issues in later drafts. In an early draft, I would suggest getting the story you want to tell down in whatever screenwriting software you’re using.
In Stencil, we have a major focus on story. We have many screenwriting tools built in that are designed to help you shape and enhance your story.

For example, we have a screenplay “notes” section which allows others on your team to provide feedback on your script. We also have a writing checklist tool to help ensure you’re focused on the most important story elements within each scene (see image above). Notice that you can check each item off as you complete it, and if you’re not sure what an element is, you can simply click on the text and learn more about what’s being asked of you.
You can also place any scene ideas you have in the “scene ideas” tab. Or you can click on the “notes” tab to add any notes related to your scene goal. Or on the “obstacles” tab, to plan out your scene’s obstacles or tension.
Over to the left you’ll also see a scene-by-scene breakdown of your script (see image above). This allows you to view your screenplay’s scenes at a glance and in sequential order.
Here you can also add your starting and stopping slug-lines so you can see how your scenes flow in and out of each other. You can create interesting dramatic friction between scenes by planning how scenes bump into each other. Similarly, within each scene’s plot card, you can grade each scene’s performance on some of the most important narrative elements. For example, you might ask yourself, “how good of a job am I doing in developing my character or my plot in this scene?”
Once you start writing, Stencil will keep track of your scene progress in the right sidebar (see the top right corner of the image above). For example, based on your scene’s target word count you’ll be able to see how close you are to finishing.
And at the top of the page, you’ll see data relating to your overall project’s progress. Here you’ll see your film or documentaries screen-time, total words, as well as your overall percent complete.
And because Stencil offers an entire suite of film production management tools (not just screenwriting tools), you’ll also find many other valuable film production tools built into our platform. For example, you can add your scene’s characters as well as create shot lists within our software.
You can also embed Stencil’s production management software directly into your own studio website and brand it to look like your own. But that’s for another conversation, I’ll cover these production tools in an upcoming tutorial.
Conclusion
So that’s all I have for you today. I hope you’ve found this tutorial on screenplay formatting helpful. If you’re looking for more content like this, head over to our film production blog. We publish helpful tutorials, interviews, camera tests an much more over on our blog regularly.
Lastly, if you run a film studio and you’re looking to integrate all of your film production software needs into one platform, simply head over to our homepage to learn how we can help.
Thanks for stopping by today!

All-In-One Film Production Software
Stencil comes will all of the tools you need to manage your film production studio. We help you manage storytelling, budgeting, casting, location scouting, storyboarding and so much more!
![]() Software version 1.1.1
Software version 1.1.1
![]()
A software solution designed to help filmmakers complete compelling stories.
![]() Version 1.1.1
Version 1.1.1
USE CASES
Feature Films
Documentaries
Shorts
Music Videos
Commericals
Fashion Films