STENCIL.ONE
Casting Software For Film & TV
In this tutorial we’re going to look at how to use Stencil’s casting software for film and TV studios. You’ll learn how to create custom casting calls and crew calls.
![]() Software version 1.1.1
Software version 1.1.1

Creating Casting Calls to Find the Best Talent Possible
In this tutorial we’ll take a closer look at stencil’s audition and casting software for creative studios and film and tv companies.
Casting Calls & Crew Calls
Our casting software is split up into two sections.
Casting Calls: Used to attract acting or performance talent to your project.
Crew Hiring Calls: Use to attract crew (cinematographers, make up artists, 1st Ads, set designers etc.) to your project
The logic behind both sections is largely similar, with the main differences being the information asked from the users in the front-end. However, there are some other important differences as well which we’ll get to shortly.
Setting Up A Casting Call
To begin, sign up and then login into Stencil. If it’s your first time using Stencil, remember that you can always embed Stencil directly into your own studio’s website and brand it to match your brand’s colors. You can whitelabel Stencil to make the software look like it’s your own. Doing this will allow your cast and crew to login directly through your own website where they can then interact and stay up to date on the projects they are assigned to. To white lable our film software, simply login and then click on your user avatar in the upper right corner. From there select the white label tab and copy and paste the code directly into your own film studio’s website. To change the colors, simply click on the styling tab to change the software’s colors to match your brand’s colors.

However, for now let’s click on a project we want to add a casting call to, and then from this page, we’ll see a link in the sidebar to “add a casting call”. You can click on that link now. However, keep in mind if you wanted to add a crew call to find directors, cinematographers, 1ADs and so on, you’d simply click on “add a crew call” in the sidebar”. But for now, let’s click on “add casting call”.
Now, on this page you can see that I already have casting calls created. In the image below you’ll notice a casting call where you can see the casting call’s title, location and filming dates.
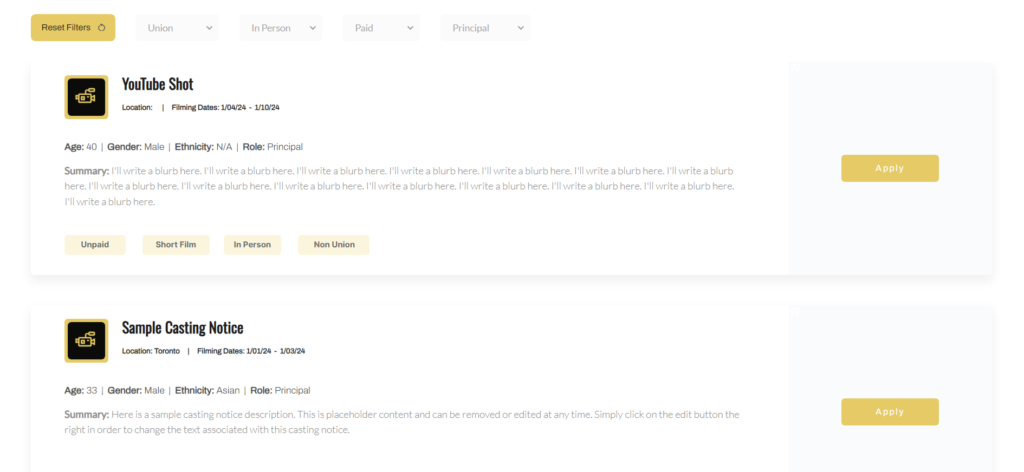
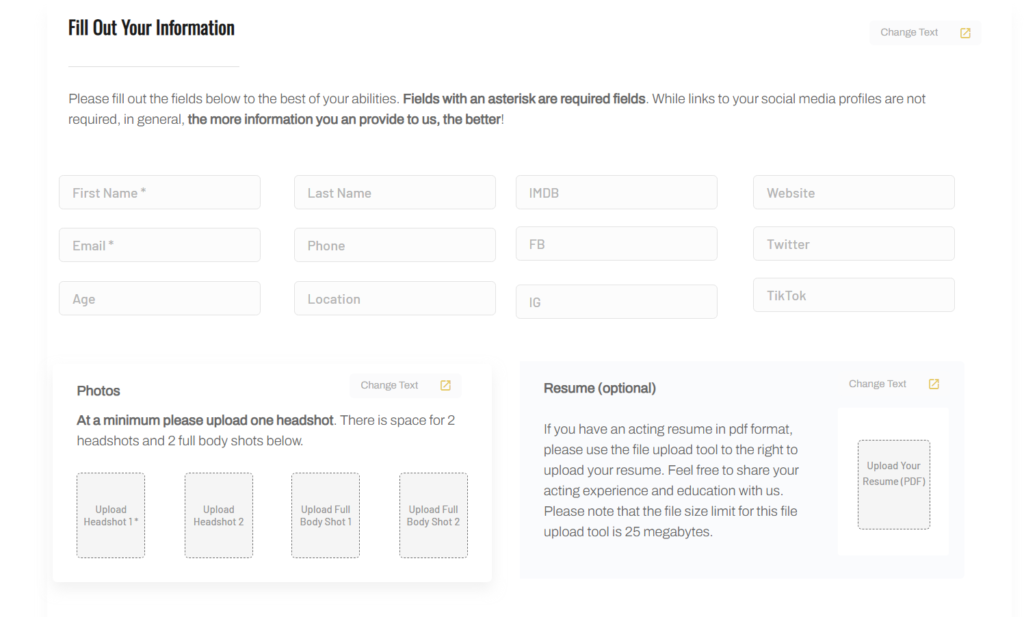
Below that, actors will be able to see information regarding the role being casted for. For example, in the image above you’ll see the character age, gender, ethnicity, role as well as a character description.
Below that, actors can find out further information about the available role including information about if the role is paid or unpaid, a short film, documentary, music video, commercial or feature film, if the audition will take place “in person” or if the actor can self-tape their first audition. Lastly, you can state if the role is a union or non-union role.
Over to the right, you’ll notice that actors can now click on “apply” to submit their information for this role.
Whitelabel & Embed Casting Calls
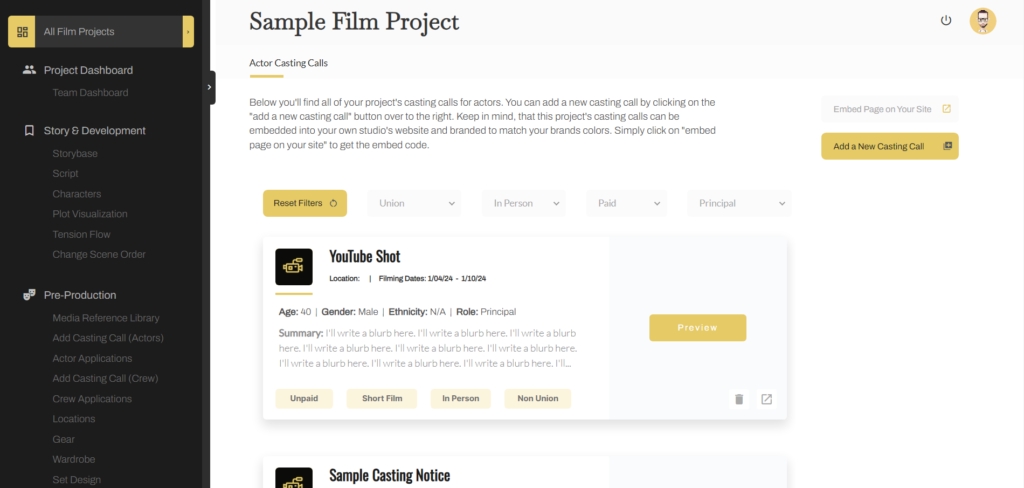
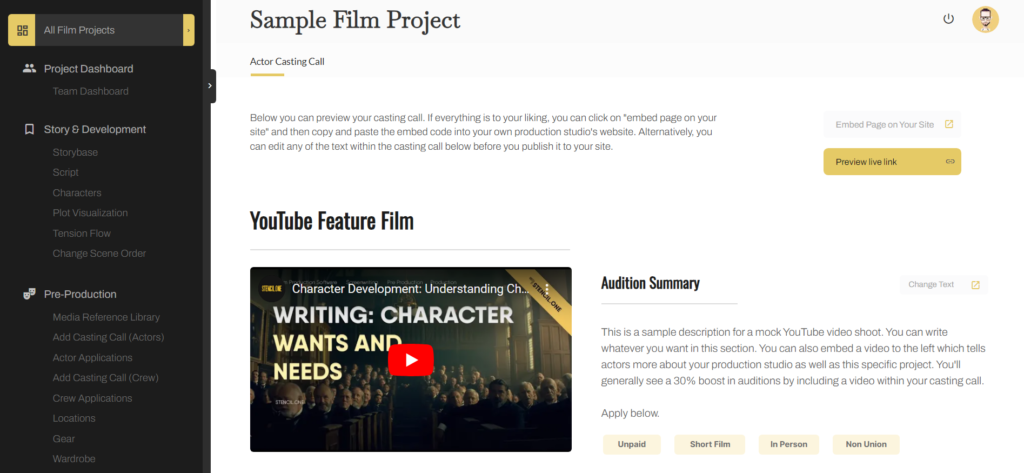
Now, keep in mind that you can embed all of your project’s casting notices on your production studio’s website by simply clicking on the “embed page on your site” button (see image below). From here, you’ll be able to copy and paste this embed code directly over to your own film studio’s website.
For example, I can grab the code that shows up in the popup and then head over to my studio’s website to paste that code within my studio’s website builder.
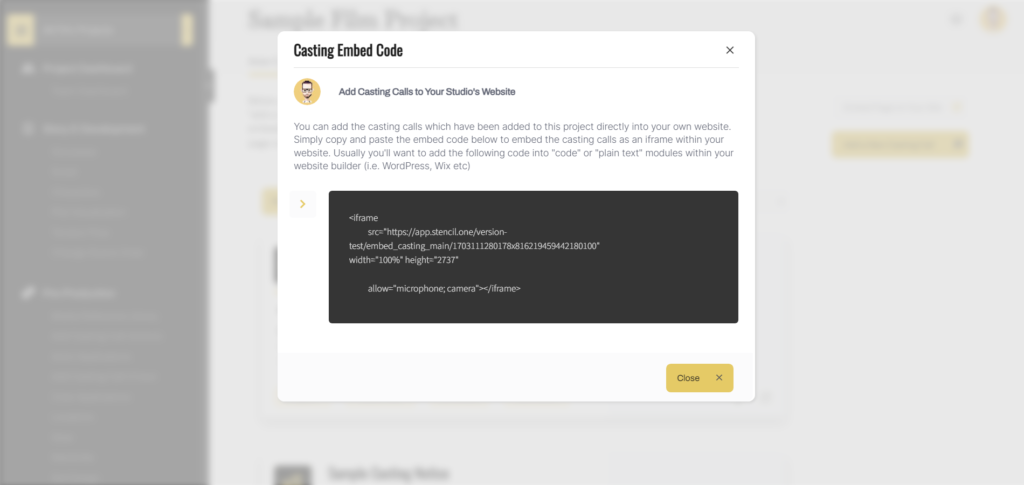
As a studio owner, producer or casting director you can now share the link where you embedded this code and direct actors to your own video production studio’s website rather than a third party website in order to audition for the roles you have available.
So that’s how you embed all of your casting calls into your production studio’s website. But let’s jump back into Stencil here in order to look at an individual casting page. If you were to click on the “preview” button to the right of the casting notice you’d be brought to the specific casting call’s form (see image below).
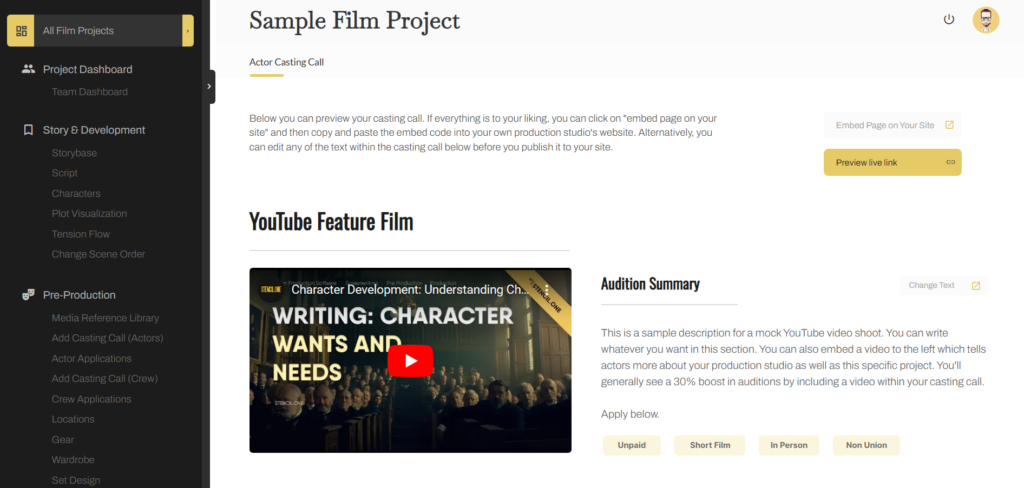
From here, your potential actors can see the casting call’s summary and watch a short clip about the role you have available. Below that, they will be able to add their personal information as well as provide links to any social media accounts they have. Further below, they can add their headshots and resume.
Casting Calls: Self-Taping Software
Below that, actors will see the “self tape” section. Our self-taping audition software is incredibly valuable because casting directors can gather much more information about an actor if the actor records themself for their initial audition. It’s a great way to pre-filter actors and allowing actors to self tape is a great way to improve casting effeciency when it comes time to start bringing actors in for in-person auditions.
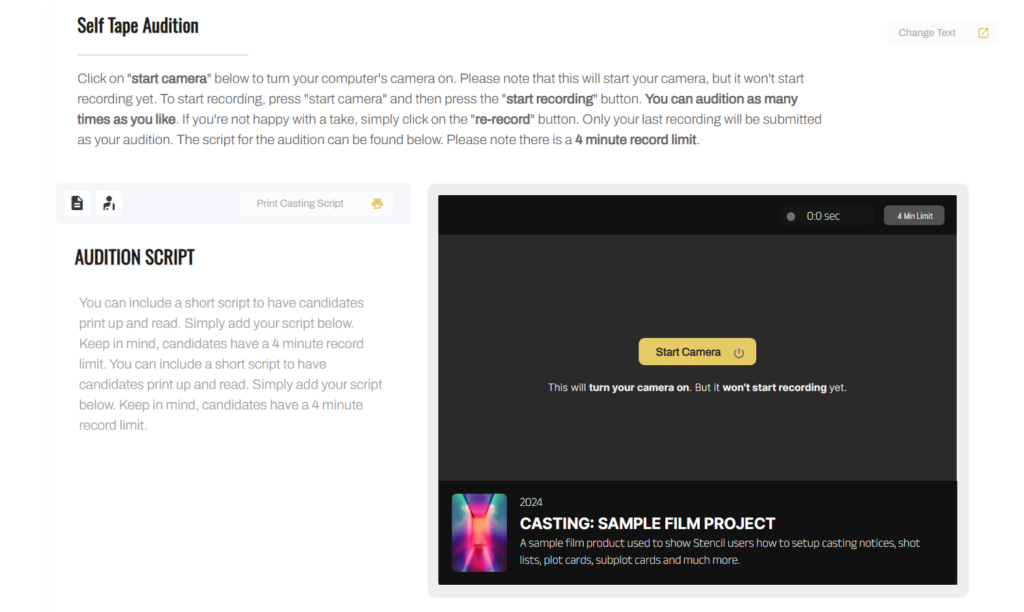
Keep in mind, the self-taping section is only visible if you’ve enabled “self taping”. However, if you have self-taping enabled, actors will be able to read instructions on how to use your self-tape software and then below that they can toggle between two different tabs. The first tab is the audition script and the second tab provides character background information.
Next, once the actor is ready, they can click on “start camera” and then “start recording”. After giving their audition, if they are happy with their performance they can click on “stop recording”. During this step, they can watch what they recorded. If they are still happy with their performance, they can skip to the next section and submit their audition to you. If they are not happy with their performance, they can click on the button that says “delete and try again”. Actors can keep recording until they have a demo clip they are happy with.
Next, actors can scroll down to the next section and simply fill out the checkboxes below. The first checkbox invites them to join your studio’s mailing list. The second checkbox asks them if they would be open to taking another role if they are not a good match for the role they auditioned for, and the last checkbox asks them to accept your terms and conditions.
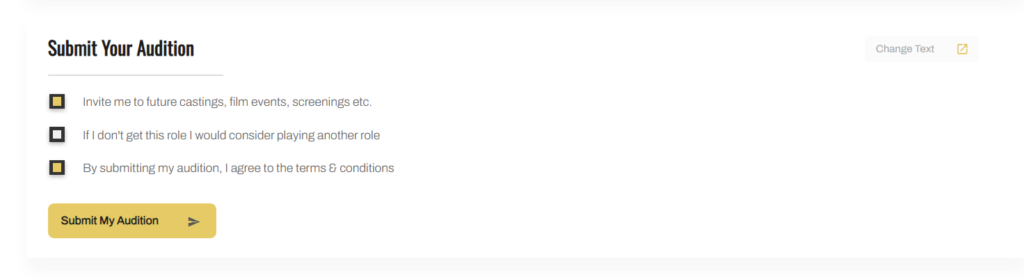
Once they are ready, they can click on the “submit audition” button. If their audition was submitted successfully, they will see a thank you message.
And from the actor’s perspective, there is nothing left to do. They simply need to wait for further instructions from you.
Embed an Individual Casting Call
Now, there will be times when you want to direct people to a specific casting notice. Previously I showed you how you could embed the entire list of casting calls over on your studio’s website. However, you can also embed and share links to specific casting notices as well. Simply scroll to the top of this page and click on this button for “embed page on your site”. Now, simply copy and paste this code over on your film production studio’s website and then you can share the link to this specific casting call across the internet.
Again, the nice thing about this, is that candidates are going directly to your website rather than to Stencil’s. In order to seamlessly integrate Stencil’s casting software into your website. Simply click on your user avatar in the upper right corner and then click on this tab for
“styling”.
Here you’re going to see your theme’s primary and secondary color. Notice, in my example I have a darker color and a lighter color. If we jump back over and look at our casting call page you’ll notice that different parts of the casting call use these colors. For example, here you see the primary color and here you’ll see the secondary color.
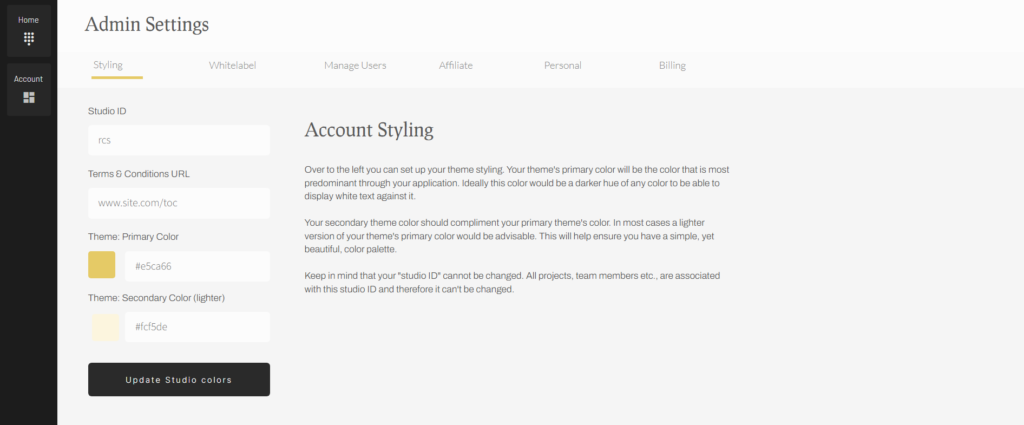
In order to whitelabel these colors to ensure they match your brands color’s simply change them over on your profile page. Once you do this, the embedded content over on your production studio’s website will remain consistent from a color palette and design standpoint.
Adding a New Casting Call
Now you know how our casting call and crew call software works, but how do you add a new casting call?
Easy. Simply head over to “add a casting call” in the sidebar and then click on the “add a new casting call” button. The following page will popup.
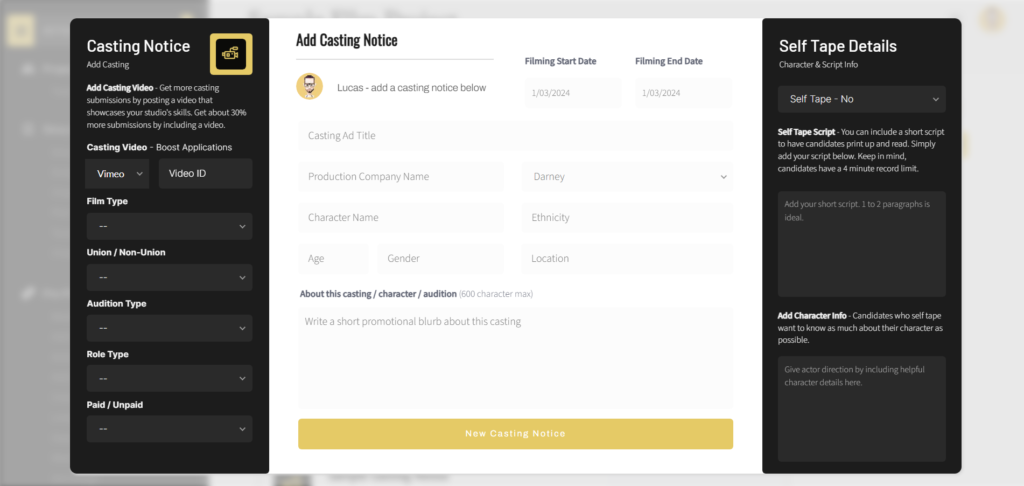
Over to the left we can add our “film type”. Notice we can select from a list of short film, feature film, documentary, music video, commercial and so on. Next, we can select if our casting call is for union or non-union actors, Next, we’ll select if the audition is in-person or if it’s self-taped. Then we’ll select if it’s a background or principal role. Lastly, we’ll select if it’s paid or unpaid.
In the middle section here, you need to continue filling out important information regarding your casting call. Most of the information requested here is pretty self-explanatory. Here, you have filming dates, casting call title and so on.
However, one thing to note here, is that when creating a casting call for actors you can actually link to the casting call to a character.
Much More Than Just Casting Call Software
Now Stencil is much more than just casting call software. For example, we have an entire section within our film production management software where we also allow you to manage your entire story.
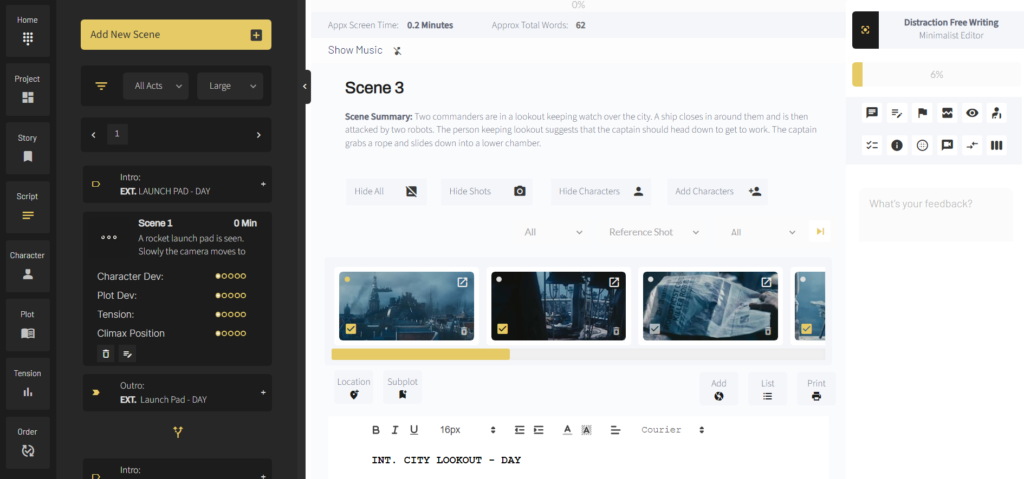
For example, if you clicked on “script” in the sidebar you could write your story’s screenplay (see image below).
Or, if you clicked on “plot visualization” you could see your entire plot play out scene by scene. Or you could click on “act view” to see how your story plays out act by act.
For example, if you were to jump back to your script page, you could click on the “checklist tab” and see that you have checklist items ranging from D1 to D6.
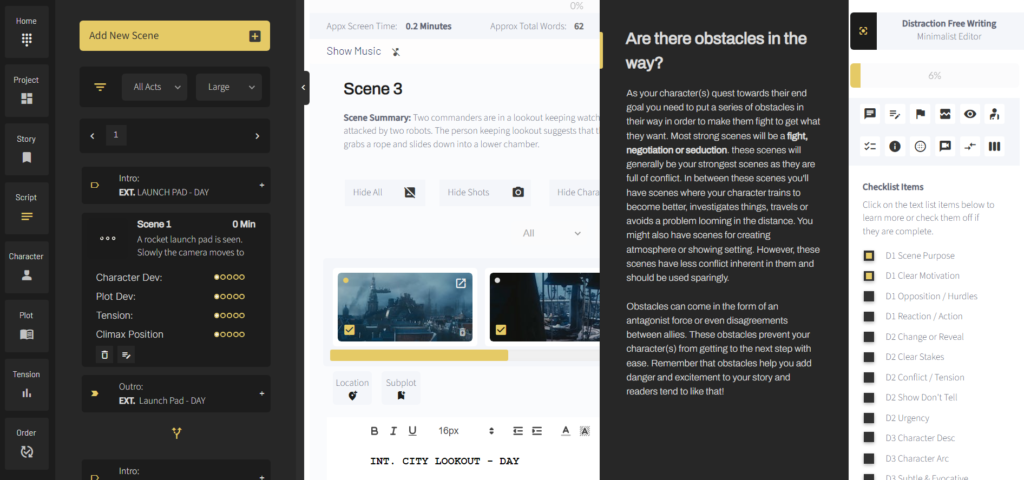
D1 meaning 1st draft while D6 mean’s 6th draft. If you don’t know what a checklist item is, you can simply click on it to bring up more info (see image above). However, as your scenes come together and get better, you can check additional checklist items off here. Then back over on your plot visualization page, you’ll see six draft dots which allow you to visually see “at a glance” where your story is at at any given time.
We also have a very powerful screenplay sub-plotting tool, but I’ll get into that in another tutorial. What I wanted to draw your attention to within this story section is the character development tools you’ll have at your disposal within the application.
Here, notice I can add new characters to my story. Each character will have their own character development worksheet.
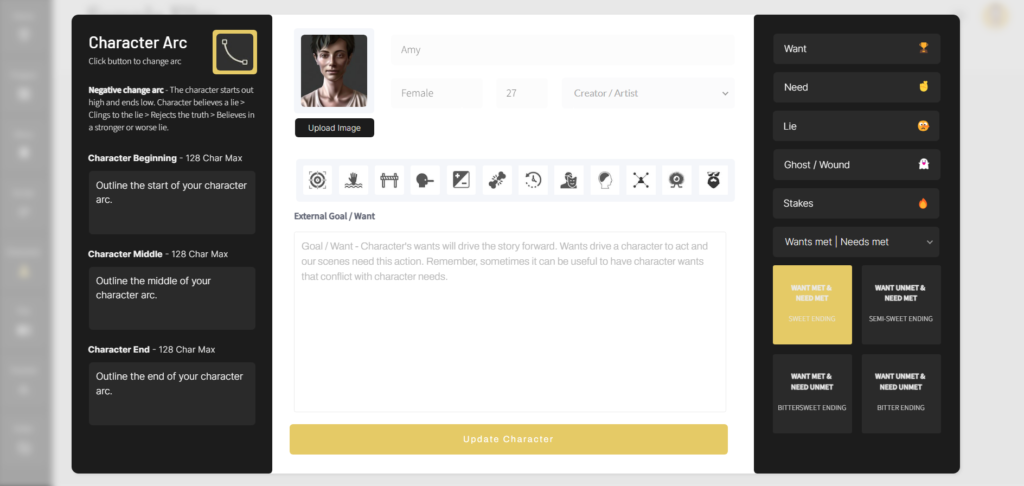
However, what I want you to know now, is that once you have a character added to this page, when you start adding casting calls you’ll be able to link your casting calls to specific characters within your story.
So back in our casting call tool, you’ll see that you can select any of your project’s character’s from this dropdown list when you’re adding a new casting call.
Once that’s done, you can continue filling out the information asked from you on that page.
Next, over to the right, you can select if you want this audition to be a self-taped audition or not. If you want it to be a self taped audition, a video recorder will show up on the individual casting call page. If you select “no” here, no video recorder will show up on the casting call page.
Lastly, I want to talk about this video url section. You can dramatically increase the number of audition submissions you get by including a short video clip which introduces actors to your project. However, if you decide to keep this field blank, no video will show up on the individual casting call page.
To add a video you simply need to select if the video is hosted on Vimeo or YouTube and then simply copy and paste the video ID to this section. The video ID is simply the alphanumeric string after the hosting site’s main URL. In Youtube it’s the alphanumeric string after it says “watch” and then the = sign. So just copy and paste everything to the right of the equal sign.
Over on Vimeo, the video ID is the ID just after vimeo.com. Make sure you’re not copying a video ID from any video groups or channel’s. You need to find the direct link to the video and then use the ID to the right of the main video’s URL for this to work.
Once that’s done, you can add your casting call. Now, if you’ve embedded this casting call over on your website, actors can start applying for the role right away.
Customizing Your Casting Calls (Multi-Language Support)
Keep in mind, the individual casting call is entirely customizable. Over in Stencil, I could click on the button to the right of the casting call and then I’ll be brought to my individual casting call page.
This page is just a preview page where you can actually change all of the text that shows up on this specific casting call. You can go to any section within the casting call and click on “change text” button.
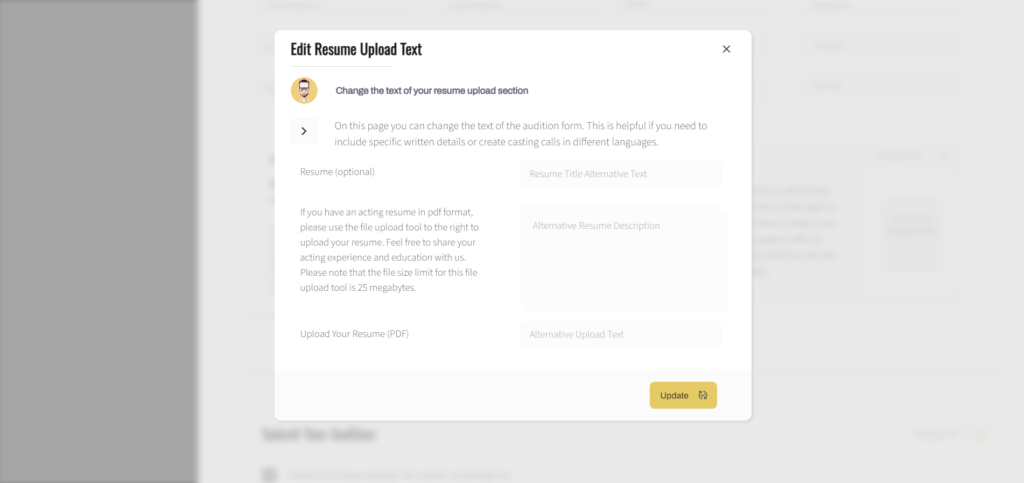
This allows you to change the text of the casting call. Simply add the text you want to change over to the right and then click save.
This is helpful if you’re trying to create a casting notice in another language outside of English. You could easily add casting notices in Spanish, Mandarin, French, German and so on. Or perhaps what you’re looking for in terms of cast and crew is specific to your industry or company. For example, perhaps you run a dance studio and you want to change the language of the casting call to reflect your industry… that’s totally possible to do as well.
Once you make the change, all language changes will show up on your embedded casting calls as well.
Filtering Audition Applications
Now, once audition applications start rolling in, you can view and filter applicants by clicking on “actor applications” in the sidebar.
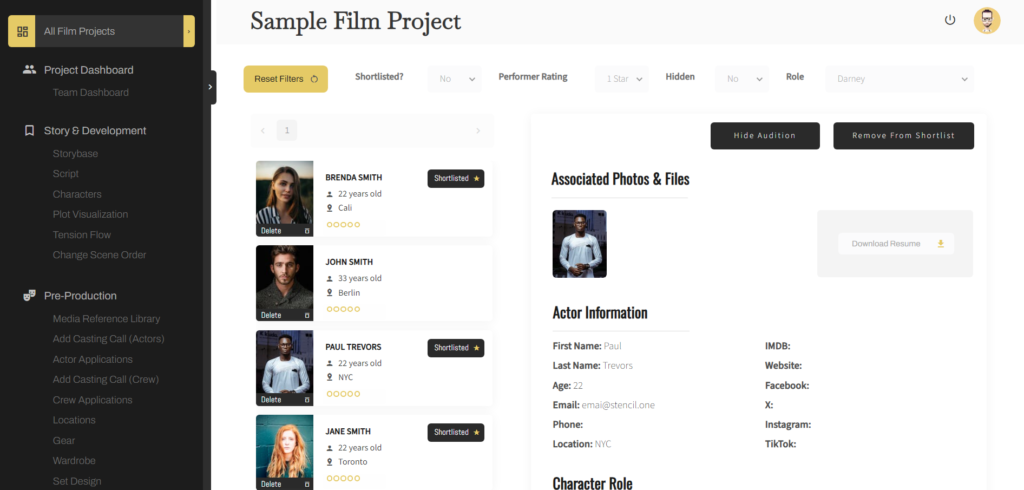
From here, you can rate each applicant out of 5 by clicking on this section here.
If an applicant is particularly interesting to you, you can shortlist them by clicking on the shortlist button in the upper right corner of the page. Now, you’ll notice in the sidebar that a star shows up beside the name of each shortlisted actor (see image above).
If, on the other hand, an audition falls outside what you’re looking for, you can click on the “hide” button. Or, if the applicant is not at all what you’re looking for, you can delete their audition.
You can click on any applicant to bring up their personal details over to the right. You can click on their headshots to see a larger image. You can also download their resume and view their other personal information below.
Under the applicant information section, you can add any notes about the actor’s audition. You can also change the character you want to associate an actor’s audition with. This is helpful, because it allows you to group candiates for a particular role together.
This allows you to compare candidates for a specific role side by side by using the dropdowns at the top of the page. For example, you could filter candidates only to show submissions for a specific character, or only shortlisted applicants.
Casting Call Conclusion
So that’s Stencil’s casting software in a nutshell. If you need help whitelabeling our film software and getting it embedded on your own studio’s website, simply reach out to us. Someone on our team will be happy to help.
Thanks for stopping by today!

All-In-One Film Production Software
Stencil comes will all of the tools you need to manage your film production studio. We help you manage storytelling, budgeting, casting, location scouting, storyboarding and so much more!
![]() Software version 1.1.1
Software version 1.1.1
![]()
A software solution designed to help filmmakers complete compelling stories.
![]() Version 1.1.1
Version 1.1.1
USE CASES
Feature Films
Documentaries
Shorts
Music Videos
Commericals
Fashion Films