STENCIL.ONE
How to Create Shot Lists For Your Films & Docs
In this tutorial we’re going to look at a shot list creation tool that allows you to visually plan your entire scene while at the same time giving your camera department information regarding camera setups.
![]() Software version 1.1.1
Software version 1.1.1

A Shot List Tool To Help You Experience Your Film & Plan Your Shots
In today’s tutorial we’re going to learn how to create shot-lists for a wide range of film or video productions from films and documentaries to commercials and music videos, so let’s jump in.
Introduction to creating shot lists
Shot-lists are an invaluable tool that allow you to plan out your scenes before they are shot. For example, scenes, like the one you watched in the video above are complex enough that they require that you plan your shot lists and coverage before you show up on set. For most scenes, you’re not going to want to “wing it”. You’re going to want a plan. And shot-lists are that plan.
There are many different ways to create shot-lists, you can even use a pen and paper if you like, but for today’s tutorial I’m going to be using Stencil, as Stencil’s built in shot-list software gives you an enormous amount of control over your image and story planning. For example, as you can see in the image below, when it comes to image planning, you can use reference images, sketches or even pre-production location photos. Once you’ve completed a shot, you can even upload an actual production still, which allows you to watch your film or video project come to life in real time.
If you want to follow along, using this exact shot list planning tool, you can sign up for a free trial of Stencil here.
So let’s jump in
After logging into Stencil, click on any project that you’ve already created. You’ll now be on your main project’s communication page where cast and crew can chat and your administrative team can post production updates. You can also track your project’s progress through the 6 stages of development near the top of the page.
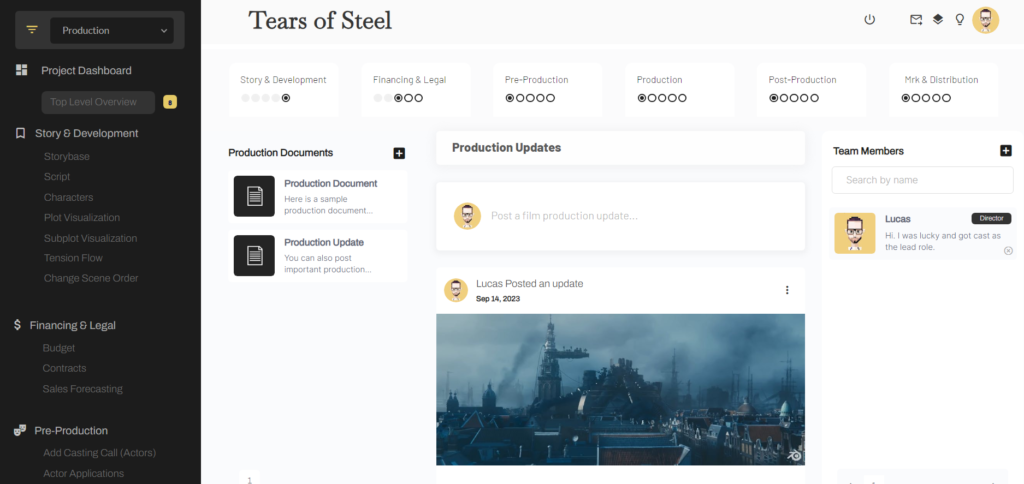
As a quick sidenote, Stencil can also be embedded directly into your own film studio’s website and branded so that the colors match your brands colors. This allows you to, not only create your shot-lists directly on your own website, but also to integrate your casting calls, your screenwriting software, location scouting tools and many other production tools directly into your own production studio’s website. But that’s a conversation for another time. Let’s continue with our focus on creating a shot list for this project.
Script Page
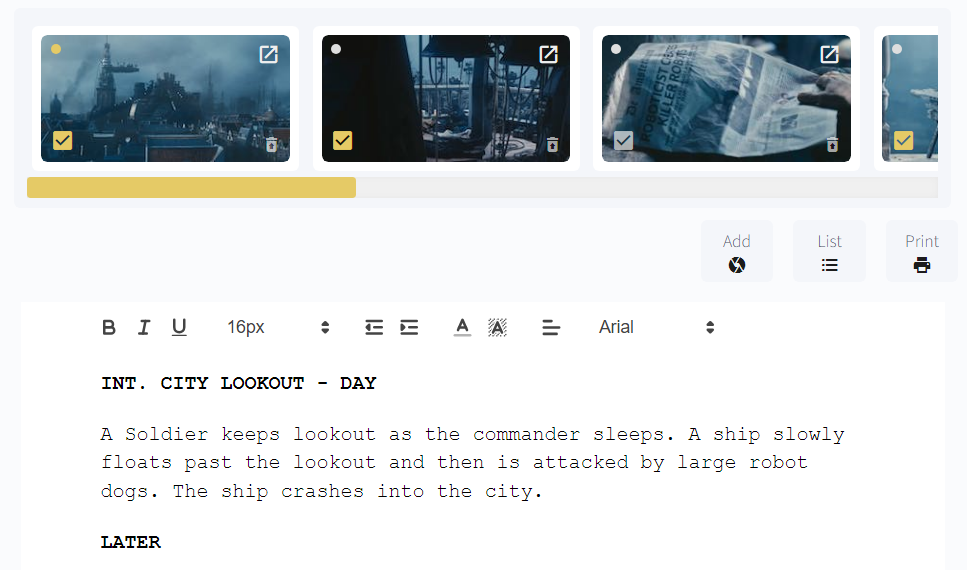
From this page, let’s click over to our script page. On this page you’ll notice that I’m already mapping out a tentative shot-list. The shot list exists right above my script.

If I just want to focus on writing and I don’t want to see my planned shots, I could close down this section by clicking on the “hide all” button. Alternatively, to show my shot list I could click on the “show all” button (see image above).
Viewing a full list of your shots
If I wanted to see a full list of all my shots, I could view a full shot-list by clicking on the “list” button.
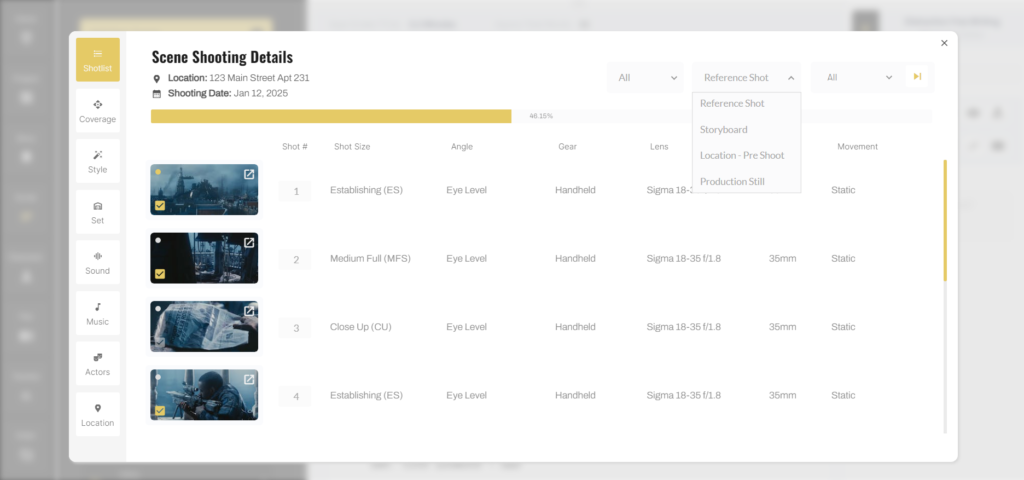
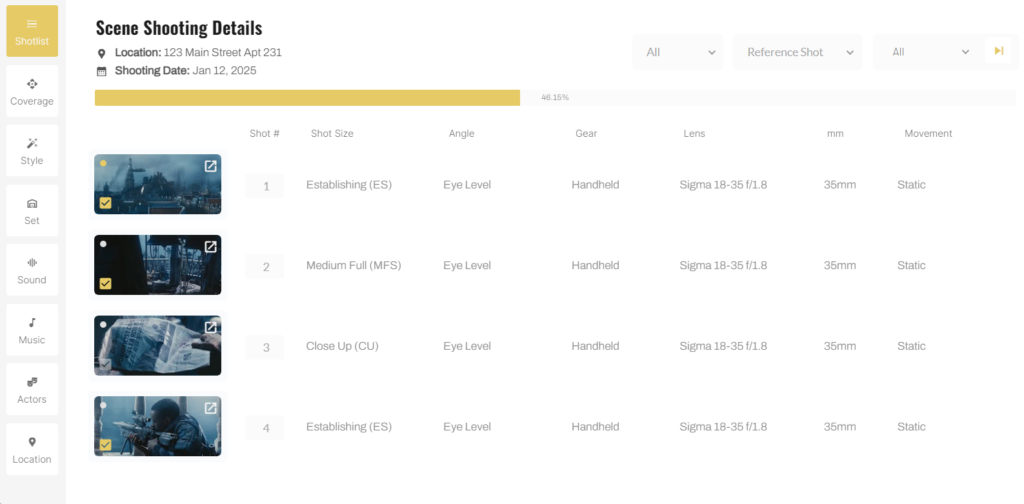
Notice on this page, I can see more granular details about each of my planned shots including – shot size, angle, gear, lenses used, as well as camera movement.
Adding a shot to your shot list
So let’s jump in and learn how to add a new shot to our shot list.
To add a new shot, simply click on the “add” button directly above your script. A popup will open which will ask you about this shot’s technical details.
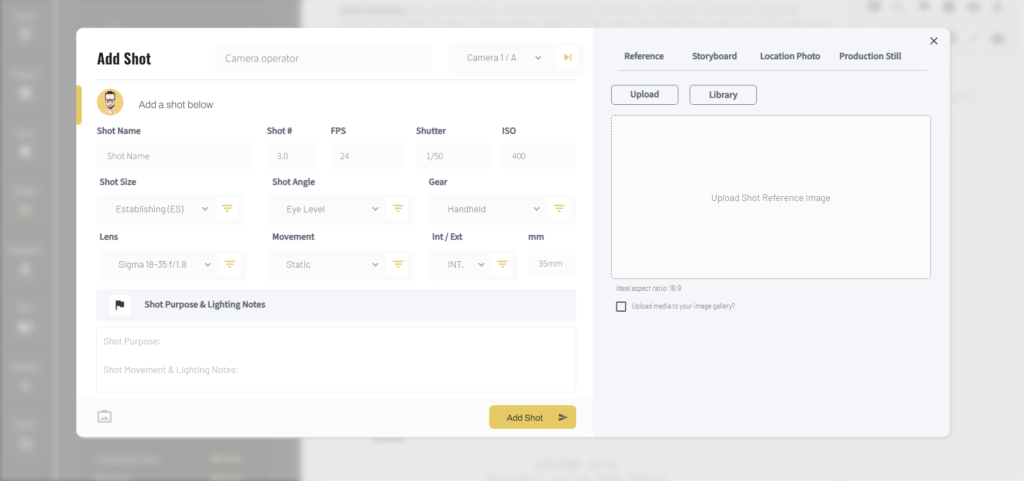
These details are invaluable, especially on shooting days, when your director and cinematographer are pressed for time and need to know camera spec information quickly. They can simply look at this page and find out information about this shot setup such as frames per second, shutter speed, ISO, shot size, shot angle, gear required, lenses needed and planned camera movement information.
This information, combined with reference images, helps ensure that you not only ensure consistency between camera shooting specs between different camera setups, but it also ensures that you optimize your chances of taking the images that exist in your imagination and realizing them on screen.
Uploading images
Over to the right (see image above), you’ll be able to upload images associated with this shot. There are 4 options available to you.
1. Reference images are images similar to the ones you’re questing towards.
2. Storyboard images will be rough pencil and paper sketches of your shot idea.
3. Location photos are actual photos of the location you’ll be shooting at. Of course these images will likely be lower quality than the final production stills because they will often be undesigned and unlit, but they will give your cinematographer and camera department an idea of the location you’ll be working at.
4. Lastly, we have production stills. These are stills from your final shoot and can be uploaded to allow you to see how the scene is coming together in real time.
Every shot can have one image uploaded for each of these four categories. This is because you’re able to toggle between them over on your main writing page here. For example, by default, I’m seeing my reference image shot-list, but if I wanted to view this in storyboard format I could do that easily by selecting ‘storyboard” from the dropdown here.

Planning entire shot sequences
Within Stencil, one of the things that was really important for us was to allow filmmakers to pre-plan an entire sequence or scene. In a way, this allows you to start thinking about your final edit and do some of that shot sequence planning early on. So for example, let’s look at this short scene from an open source film project called “Tears of Steel” which was created using a combination of live action footage and blender animations.
Now, In Stencil, I’ve already added all of the shots from this scene which you can see in the image above. What you’ll notice, after watching that scene is that there are a total of 13 shots.
If, for whatever reason, you need to change the order of your shots you can do so by dragging and dropping them on your main writing page, or you can do the same by dragging and dropping them over on your main list page.
In Stencil, If you need to change a shot number, you can change it within the application and it will save automatically.
Now what I want you to notice about these 13 shots, is that some of them are from the same camera setup. For example, shots 4, 8 and 11 are all shots from the same camera setup. Shots 5 and 7 are also the same, and it’s likely that shots 9 and 12 are from the same camera setup.
So essentially, we’re jumping back and forth between camera setups, so we need to think of a way to group our shots.
In this film’s final edit, some of these camera setups will be responsible for delivering two or more of the shots within our storyboard sequence. So we need a way to group them because they are not unique shots. They are from the same camera setup and they could even be from the same take.
However, if we grouped these shots initially by camera setups, we wouldn’t be able to see how the full scene would play out in our shot-list, which in our case is doubling as a storyboard as well. In this case, if we grouped our shots from the start we would only be able to see 9 of the 13 shots, because this scene only requires 9 camera setups.
So in Stencil we wanted to find a way to give you the ability to plan and view your scene in terms of how it will actually play out on screen. This is often how your writers and directors will want to look at a scene because it’s how your audience will experience it. However, at the same time, we wanted to give you tools which would allow your camera department to streamline camera setups and shooting workflow on production days.
A cinematographer, for example, might not want to see all 13 shots. For them, knowing the 9 camera setups is all they need to know, and they will let the editor take care of the rest.
Camera groupings
At Stencil, we solved this dilemma through camera groupings. Remember, when adding a new shot, we had the option of associating that shot with a camera.
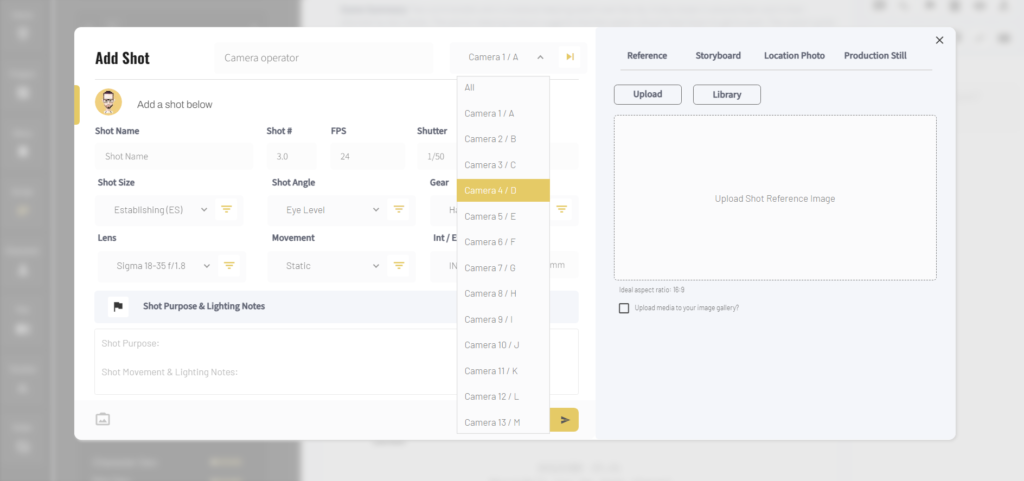
So let’s imagine for example, that we have 9 camera setups. When adding each of these shots, we simply need to associate that shot with the camera setup that it’s linked it. So let’s do that now.
If you’re shooting a scene with many different camera setups or shot changes, you can always add more cameras by clicking on the left and right arrow icons beside the camera dropdown when adding a new shot, to get access to a total of 26 different camera setups.
Now, that this is setup, we can toggle by camera over on our main script page. We can also toggle by camera over on our shot list page here.
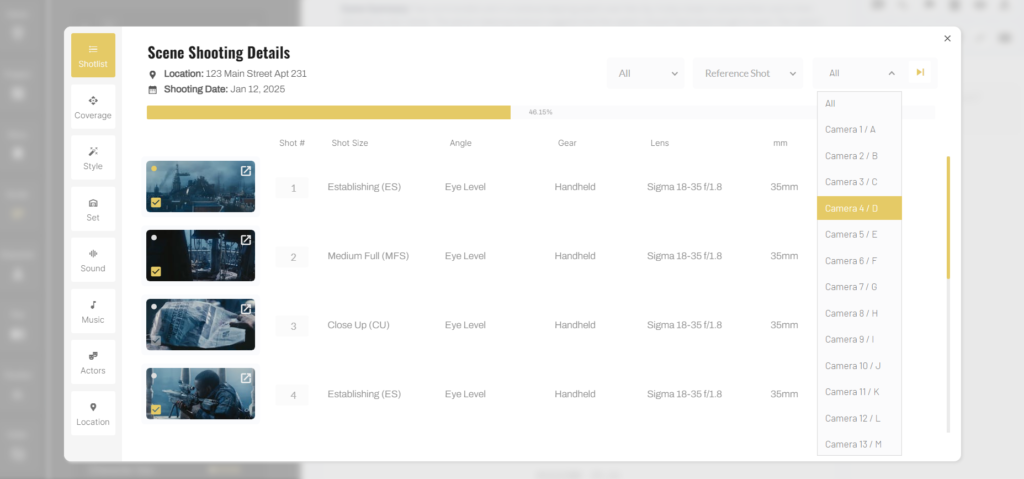
From a production standpoint, you’re now ready to start work. So let’s imagine that you’re going to start the day shooting your “D” camera footage. To keep your camera department on the same page, you can toggle this drop down to show shots only related to your fourth camera setup (or your “D” camera). And then, you can click the little dot in the upper left corner of the image to indicate this is the shot you’re currently working on. Once you’ve completed these shots, you can de-select this shot as the active shot, and you can mark the shot as complete down in the lower left corner of the image .
Also, If you need to review your camera specs for this shot, you can simply click on the icon in the upper right corner of the image to be able to view and edit this shot’s details.
Once you’ve finished this shot, you can set the drop down value to show all camera setups again, and then you can see that shots 4, 8 and 11 are completed.
You can also view your shot-list based on complete vs incomplete shots. Simply click on the list button and then toggle the “complete / incomplete” dropdown to show only complete, or only incomplete shots.
Also, If at anytime you want to see a larger version of your planned shot, simply click on the image to see an enlarged version of the shot you’re working on.
What’s also interesting, is that on your main shot-list page, you’ll see a progress bar, which shows you how far along you are in your days work capturing the shots from your shot list. As you mark shots as complete, this progress bar will update in real time. This gives your cast and crew a sense of how much more work needs done before this particular scene is wrapped.
Conclusion
So that’s Stencil’s film production shot-list software in a nutshell. In the next tutorial I want to take this a step further and show you how you can link your film’s shot list to a camera coverage plan within Stencil.
Essentially, once you’ve added shots, you can link those shots to a coverage map. For instance, using the 9 camera setup example we talked about previously, you could add those cameras to your coverage page (see image below). You could then add your actors and any other important information.
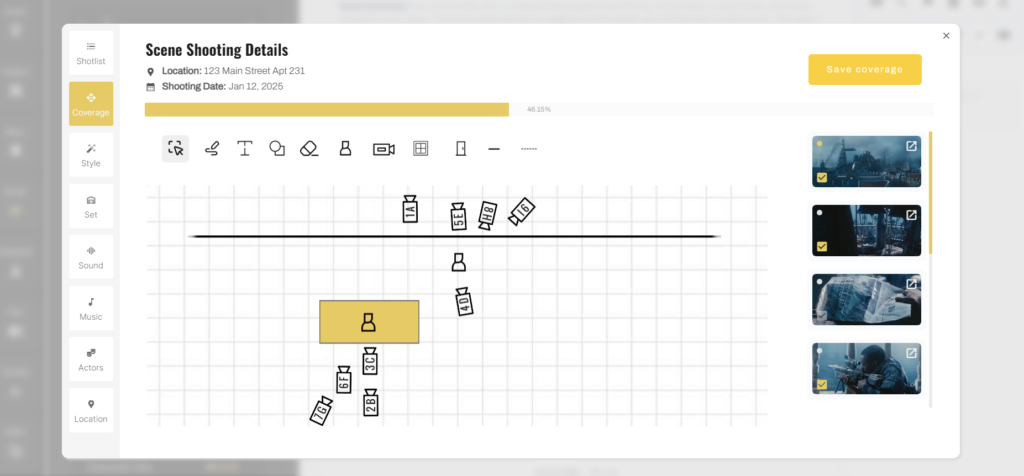
In fact, you could even draw a 180 degree rule line so that you ensure that your cameras stay on the right side of that line.
Now, you’ll notice that when you click on any of your cameras, over to the right, the shots associated with that camera show up. For example, if you’ve clicked on your 4th camera setup, or “camera D”, you’ll notice only shots associated with this camera setup show up over to the right. Again, this is just another way for you to visualize your shot list and efficiently plan out the work that needs done for the day.
However, we’ll talk about this coverage tool in the next tutorial.
I hope you found this tutorial on our shot list software valuable. And remember, if you run a film studio and you’re looking for film production management software to help you manage each step in the film production process, head over to Stencil today to sign up for a free trial.
Thanks for stopping by today and don’t forget to check out our filmmaking blog we add new film tutorials, interviews, camera tests, and filmmaking tips and tricks to our blog regularly.
I’ll see you in the next one!

All-In-One Film Production Software
Stencil comes will all of the tools you need to manage your film production studio. We help you manage storytelling, budgeting, casting, location scouting, storyboarding and so much more!
![]() Software version 1.1.1
Software version 1.1.1
![]()
A software solution designed to help filmmakers complete compelling stories.
![]() Version 1.1.1
Version 1.1.1
USE CASES
Feature Films
Documentaries
Shorts
Music Videos
Commericals
Fashion Films